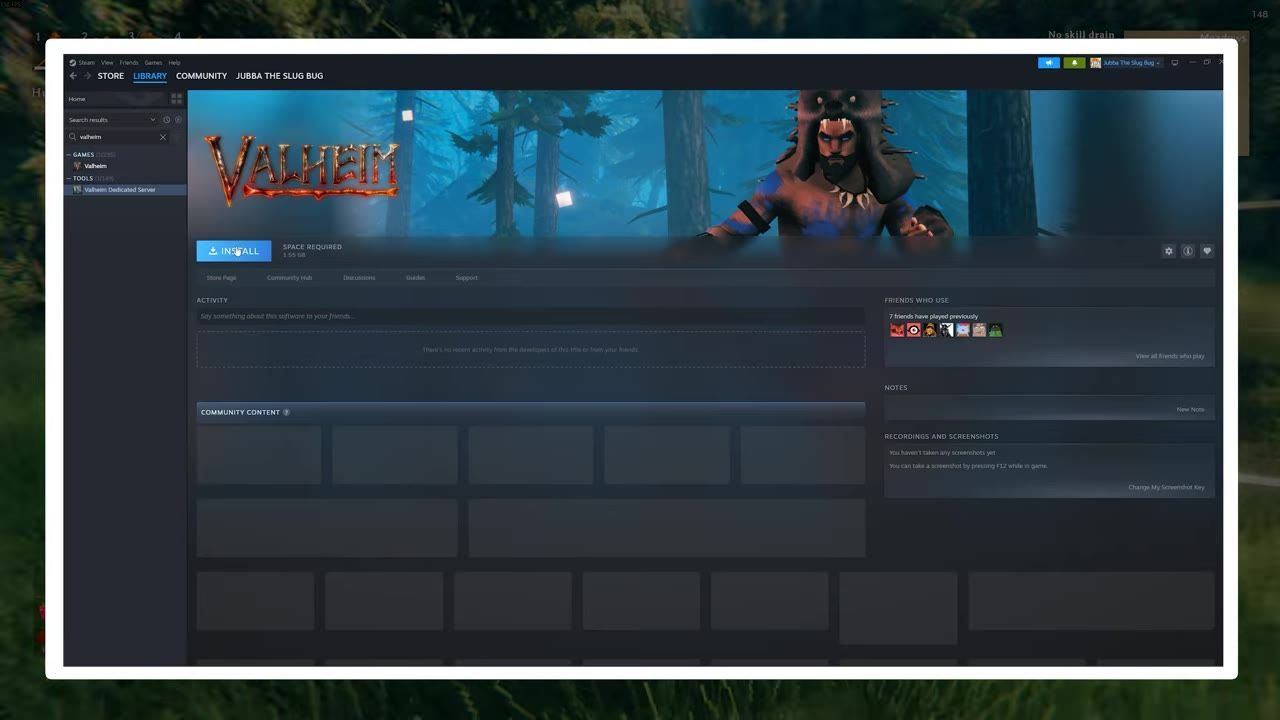
Download the dedicated Valheim server from Steam's Tools library, configure the BAT file to customize server settings, and launch the server to enable multiplayer and crossplay features.
Download the Dedicated Server Software
To begin hosting a Valheim server, you need to download the official dedicated server software via Steam.
steps
- Open Steam and navigate to your library. Click the dropdown menu in the top left corner and select the "Tools" category.
- Locate the "Valheim Dedicated Server" entry in the list.
- Click "Install" to download and install the server software to your system.
Locate and Configure the Server Files
Once the software is downloaded, you'll need to adjust its configuration files to set up your server.
steps
- Right-click "Valheim Dedicated Server" in your Steam library, select "Properties," and navigate to "Installed Files."
- Click "Browse" to open the server installation folder.
- Locate the "start_headless_server.bat" file and open it with a text editor.
- Update parameters such as
-namefor the server name,-worldfor world data,-passwordfor access control, and-portfor network configuration (typically set to 2456 or 2457).
- Update parameters such as

The server installation folder for Valheim is opened and displays its contents. — All Things Hosting
Enable Crossplay Functionality
To allow cross-platform multiplayer, make an additional adjustment to the BAT file.
steps
- In the BAT configuration file, add the
-crossplayargument. This ensures the server supports connections from Xbox and Game Pass clients. - Save and close the BAT file after making your changes.

The BAT file editor displays server command arguments, including the crossplay parameter. — All Things Hosting
Launching the Server
With the configuration complete, it's time to launch your Valheim server.
steps
- Double-click the modified "start_headless_server.bat" file to launch the server.
- A console window should appear. Look for the message "Game server connected" to confirm the server is running.
- Share the server's connection details (IP, port, or join code) with other players.

The server console log displays the message 'Game server connected'. — All Things Hosting
Backup and Security Tips
Safeguarding your server's data and ensuring secure connections are crucial.
Alternative: Hosting Providers
If self-hosting feels too complex or you want a fully managed solution, consider using a professional hosting provider.
comparison
Self-Hosting You have full control over server settings, but need to manage backups, security, and performance manually. Requires you to keep your machine powered on when players need access.
Hosting Providers Services like Pine Hosting offer near 100% uptime, robust security against DDoS attacks, and professional support to handle technical issues. Costs are manageable when shared among players, and setup is effortless.

Details and pricing of Valheim server hosting services by Pine Hosting are displayed. — All Things Hosting
FAQ
how to host a dedicated Valheim server for crossplay and multiplayer
To host a dedicated server in Valheim, download the Valheim Dedicated Server software from Steam's Tools library. Configure the "start_headless_server.bat" file, adding details like server name, world data, and the -crossplay argument for Xbox and Game Pass support. Launch the server and share connection details with players.
Sources
Screenshots on this page are frames from the videos below, used to illustrate the steps they describe. All rights remain with their creators.
- How to Host a FREE Valheim Dedicated Server (2026) | Step-by-Step Steam + Crossplay — All Things Hosting, October 31, 2025
Checked against:
- Valheim Has A Release Date! — IronMontilyet, 2026-06-07
- Patch 0.221.13 (Public Test) — IronMontilyet, 2026-05-06